Showing posts with label quick. Show all posts

Monday, 14 July 2014

Tutorial: Die-cut card

Hello all!

Yes! This is a tutorial! On a Monday even! I have my act together this week haha!

So recently I wanted to make a simple, yet meaningful card, and decided upon this die-cut option, featuring beautiful vintage craft supplies sourced from Lisa's Craft Shoppe (I also featured her lovely supplies earlier, in this notebook tutorial. Find her links at the bottom of this post). Have a go, and share your beautiful cards with us!

 You will need:
2x blank cards
Pencil
Glue
Cut-outs, stickers etc
Craft knife/scalpel
Cutting board

On one of the cards, trace what you want to cut out in pencil. Here I have chosen the words 'Thank you', and modeled them from a font on the computer.

Now be careful here! Using the  cutting board and scalpel, cut out your tracings. The sharper your scalpel is, the better it will come out.


On the other card, stick down your background. You don't have to cover the entire card, but just make sure that you cover the areas which will be exposed by the die cuts. I have used vintage bits and pieces from Lisa's Craft Shoppe

Then line up the cards, and stick the cut one on top of the covered one. And you are done! Simple, yet thoughtful :)


You can find Lisa's Craft Shoppe on Etsy, Facebook and Twitter. Go check her out!

Monday, 10 March 2014

Another DIY notebook tutorial!

Hey all!

Its finally happening! I'm posting a craft tutorial (hehe).

Now those close to me know how much I LOVE stationery... particularly any paper products, and notebooks are my favourite thing to personalise.

Over time I have found various ways to put my own mark on notebooks, one of which I shared with you back here. Now here is another, slightly easier and less time-consuming tutorial, which I hope you do enjoy!


You will need:
A ring bound notebook
Background paper (I have used vintage book paper)
Stencil
Permanent marker
Scissors and craft scalpel (I left them out of the pic, sorry!)
Modge podge or craft sealant (You can use my home-made sealant from this post)


Firstly gently loosen the ring binding and remove the cover. Be careful to not bend the ring binding too much out of shape.


Glue selected backing paper onto the cover, ensuring that it is the right way up for when you reattach it! Then trim around.


Position the stencil you wish to use where you want it, and colour in with a permanent marker.


Ta Da!


Seal the cover with the craft sealant.


Using the craft scalpel, carefully carve out each of the binding holes.


Finally, reattach to the notebook (the right way up!) and enjoy! A beautiful, personalised notebook has been created!


I hope you do enjoy this tutorial, and let me know what you think, or what you would like to see next. Cheers!

Monday, 18 November 2013

Tutorial: cheap and easy home made craft sealant/modge podge

Hey there!

Any craft project can always benefit from a few coats of sealant, for protection and a glossy finish. However, commercially available craft sealant, such as Modge Podge, can be rather expensive!

The good news is that it is incredibly easy and cheap to make your own! I promise it won't cost you any more than $5 MAX!
You will need:
PVA glue
Water
Container
Stirrer


All you need to do is mix 3 parts PVA to 1 part warm water and it's done! Store in an airtight container to ensure it doesn't dry out.

What's your best craft trick? I would love to hear them!

Tuesday, 12 November 2013

Easy and cute sewing patterns - My Funny Buddy

Hey!

I know I have been a touch inactive over the past two weeks or so, but I'm back and I want to show you what I have been working on!

I was contacted by the lovely Lucy, owner of My Funny Buddy, asking if I would like to trial her patterns... of course I said yes! After a bit of browsing, I came across the T-Rex and Dog Pillow designs...


As a novice behind a sewing machine, I was a touch nervous about how the finished toys would turn out. However, there was no need to fear! The digital files I received were abound with all the necessary information, from fabric choices, to mini tutorials of stitches, to definitions of technical terms, all written in common language, making it as easy as possible!


Before I knew it, I had finished with these two little cuties!
T-Rex:

Dog Pillow:


Aren't they adorable?! They have both settled in nicely in my bed with my Big Ted :D


So if you are interested in producing hand made and heartfelt Christmas presents, or adding to your own stuffed toy collection, I strongly recommend My Funny Buddy patterns! Check out Lucy's designs on her website and Etsy shop, or head over and join her on Facebook!


Let me know how you go! I envisage these soft toys slowly amassing in their own army! Haha.


Monday, 28 October 2013

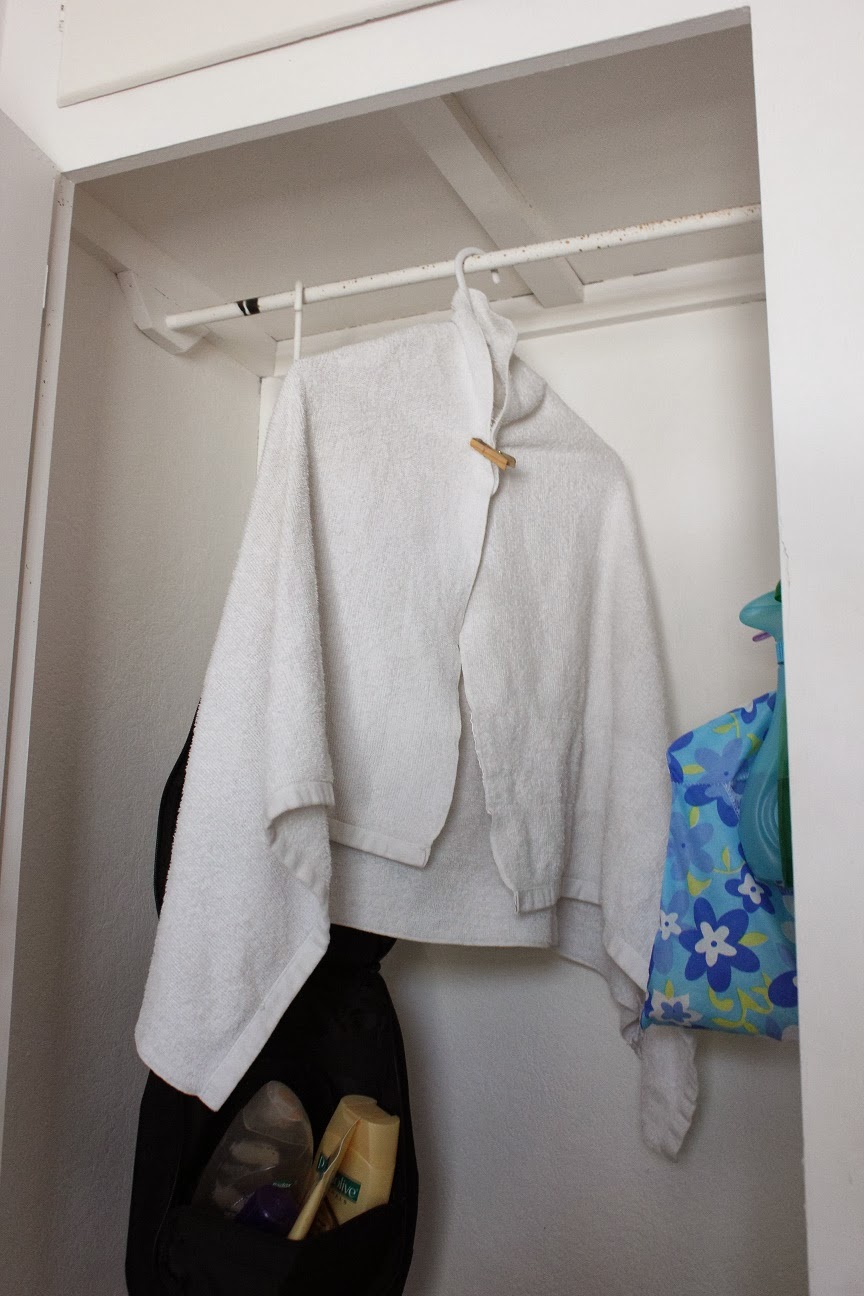
Hints and Tips - hanging towels without a towel rack

Hey!

So I live in a small room in a boarding house, which I absolutely love to bits! However, we have shared bathroom facilities, and my room has no towel rack, so I was originally stuck with soggy towels and nowhere to hang and dry them! This is obviously an issue, as not only can soggy towels harvest harmful bacteria, they can grow mold, smell, and leave you with no dry towels to use! It took me a little while, but I figured out a way to hang my towels so that they could dry out fully and properly.

You will need a clothes hanger and peg for each towel (and that's it!)!


1. Lay out your towel horizontally


2. Place the clothes hanger in the middle of the towel, with the hook above the towel's hem


3. Fold each end of the towel over the arms of the hanger


4. Peg together to hold it in place and hang them up!


Voila! An easy way to hang your wet towels, so that all of your towel is dry and hygienic to use again!

What's one of your simple tips to improvise and make-do? I would love to hear them!

Tuesday, 15 October 2013

Tutorial: Watermelon Greeting Card!

Hey there!

Today I shall run you through a very simple watermelon greeting card tutorial, which produces cute and fun results!


You will need:
- blank card
- green and white paper
- pink patterned paper
- glue and scissors
- pencil and black marker
- message
- mounting foam


1. Cut the blank card into a semi circle shape, with the straight edge at the card's fold.


2. Cover this semi circle with green paper.


3. Glue down a smaller semi circle of white, and then again with the patterned paper, so it looks like this:


4. Colour in a few black seeds with the marker, randomly and across the pink part of your watermelon.


 5. Stick on your message with mounting foam and voila! A watermelon greeting card!


Sunday, 8 September 2013

Easy DIY toiletry organiser tutorial

Hey all!

As a student, I live in a smallish room in a manor with 40 other people, so space and organisarion is absolutely critical! Until this weekend all of my toiletries were stuffed lying down in a drawer, and were constantly going missing or being left behind when I went to the shower.

I had finally had enough! So combining a few ideas and techniques I found floating around online, I have created this ridiculously easy toiletry organiser on the inside of my cupboard door.


I absolutely love it! It's fantastic to be able to see exactly what I have, and be able to grab anything within a moment's notice!

To do this yourself you will only need a few things: A shower caddy, shower curtain rings, hooks (I used adhesive ones), a magnetic strip and, of course, your toiletries! In total, the materials needed didn't cost any more than $6.

Firstly, I adhered the two hooks where I wanted the shower caddy and hair ribbons to hang. I didn't go very high, as I am quite short, but I also like things to be slightly below eye level. Really, it is completely up to you and the space you are working in.
Oh! If you are using adhesive hooks, remember to leave them for about 10 minutes before hanging anything off them, to ensure they stick properly.

Next, I hung the shower caddy. Place all of your bottles and cans in the basket, keeping the shorter ones to the front, so that you can see what you have. All of these are now wonderfully organised and within reach! I'm not longer sifting through the drawer or on my hands and knees looking through the bathroom vanity.


On the shelf underneath that, hang things which are skinnier at the bottom and wide at the top (like cream tubes or toothpaste). This creates LOADS more storage space, stops things from sliding or falling off the shelf and makes everything so much easier to see! I also just tucked my toothbrush behind these.


Now get out those shower curtain rings. These are perfect organisers in any situation at all! I hooked my hairbands onto a couple and used those to hang them off one of the hooks on the shower caddy. Off the other shower caddy hook, I hung my hair brush and a couple of my headbands.


Because I have rather short hair, my favourite accessories are clips! And I have lots of them! I also love tying a cute bow in my hair too. Usually, however, I would have to sort through a box of them to find one to put in my hair, and I would often lose or forget about them. So, to store and organise these hair clips and ribbons, I tied a loose loop in each of the ribbons and threaded them onto another shower ring. I then clipped my accessories onto those ribbons, hanging the whole shower ring off the other adhesive hook.


Lastly, grab that magnetic strip and stick it across the bottom. It's a perfect organiser for those fiddly bobby pins, which, in my case, used to always get lost! You could also attach a magnet to the back of your makeup pallets and store them here also, ready to grab just before you rush out the door!


And voila! You will wonder why you didn't organise things like this earlier!

I also have fallen in love with those shower curtain rings.... but I will leave that for another day!

What have been your organisational life savers? Let us know in the comments!