Showing posts with label upcycle. Show all posts

Monday, 14 July 2014

Tutorial: Die-cut card

Hello all!

Yes! This is a tutorial! On a Monday even! I have my act together this week haha!

So recently I wanted to make a simple, yet meaningful card, and decided upon this die-cut option, featuring beautiful vintage craft supplies sourced from Lisa's Craft Shoppe (I also featured her lovely supplies earlier, in this notebook tutorial. Find her links at the bottom of this post). Have a go, and share your beautiful cards with us!

 You will need:
2x blank cards
Pencil
Glue
Cut-outs, stickers etc
Craft knife/scalpel
Cutting board

On one of the cards, trace what you want to cut out in pencil. Here I have chosen the words 'Thank you', and modeled them from a font on the computer.

Now be careful here! Using the  cutting board and scalpel, cut out your tracings. The sharper your scalpel is, the better it will come out.


On the other card, stick down your background. You don't have to cover the entire card, but just make sure that you cover the areas which will be exposed by the die cuts. I have used vintage bits and pieces from Lisa's Craft Shoppe

Then line up the cards, and stick the cut one on top of the covered one. And you are done! Simple, yet thoughtful :)


You can find Lisa's Craft Shoppe on Etsy, Facebook and Twitter. Go check her out!

Monday, 10 March 2014

Another DIY notebook tutorial!

Hey all!

Its finally happening! I'm posting a craft tutorial (hehe).

Now those close to me know how much I LOVE stationery... particularly any paper products, and notebooks are my favourite thing to personalise.

Over time I have found various ways to put my own mark on notebooks, one of which I shared with you back here. Now here is another, slightly easier and less time-consuming tutorial, which I hope you do enjoy!


You will need:
A ring bound notebook
Background paper (I have used vintage book paper)
Stencil
Permanent marker
Scissors and craft scalpel (I left them out of the pic, sorry!)
Modge podge or craft sealant (You can use my home-made sealant from this post)


Firstly gently loosen the ring binding and remove the cover. Be careful to not bend the ring binding too much out of shape.


Glue selected backing paper onto the cover, ensuring that it is the right way up for when you reattach it! Then trim around.


Position the stencil you wish to use where you want it, and colour in with a permanent marker.


Ta Da!


Seal the cover with the craft sealant.


Using the craft scalpel, carefully carve out each of the binding holes.


Finally, reattach to the notebook (the right way up!) and enjoy! A beautiful, personalised notebook has been created!


I hope you do enjoy this tutorial, and let me know what you think, or what you would like to see next. Cheers!

Monday, 28 October 2013

Hints and Tips - hanging towels without a towel rack

Hey!

So I live in a small room in a boarding house, which I absolutely love to bits! However, we have shared bathroom facilities, and my room has no towel rack, so I was originally stuck with soggy towels and nowhere to hang and dry them! This is obviously an issue, as not only can soggy towels harvest harmful bacteria, they can grow mold, smell, and leave you with no dry towels to use! It took me a little while, but I figured out a way to hang my towels so that they could dry out fully and properly.

You will need a clothes hanger and peg for each towel (and that's it!)!


1. Lay out your towel horizontally


2. Place the clothes hanger in the middle of the towel, with the hook above the towel's hem


3. Fold each end of the towel over the arms of the hanger


4. Peg together to hold it in place and hang them up!


Voila! An easy way to hang your wet towels, so that all of your towel is dry and hygienic to use again!

What's one of your simple tips to improvise and make-do? I would love to hear them!

Friday, 13 September 2013

Frugal student life - hints and tips for students, boarders and parents!

Hey all!

So I heard it's back to school for my Northern Hemisphere contingent, and I thought I would chip in with my own tips for living frugally as or with a student.

I have been living as a student boarder in shared accommodation with 40 other students for three months now, and have picked up many hints and tips about how to stretch my tiny bank account to last me, and I still live very, very comfortably!

In this blog series, I will look at all aspects of student life including education, board and lodgings, employment, entertainment, personal health and wellbeing and much more! So head back here on Sunday when I post Frugal Student Life - Hints and Tips for Students, Boarders and Parents part one - Education!

Is there anything you would like to see covered in this series? Or do you have a handy frugal living tip to share? Comment below, I would love to hear from you!

Friday, 6 September 2013

Crafts and gifts now available online!

Hey all!

A Little Touch of Crazy has finally opened up shop online! You will now be able to purchase many of the crafts and gifts featured in this blog from the shop (click here).

Let me know what your shopping experience is like? Also, what would you like to see in the shop?

Thursday, 5 September 2013

Quick cute pencil tutorial

Hey all!

Very quick tutorial for today - adding a lovely little flair to your pens and pencils... Just use washi tape!

Actually, I personally like to use something called 'Deco Tape'. It comes in all colours and patterns, but is slightly more paper-y than traditional washi tape, so is easier to sharpen with the pencil, and slightly more opaque.

After you have finished wrapping, trim the top and bottom of the tape to neatly finish the pencil. Its best to do this with a craft scalpel.

Alternatively, you can buy the complete set of ten, shown below, from me on Etsy!Just click here!

What's your favourite thing to do with washi tape? Comment below!


Saturday, 31 August 2013

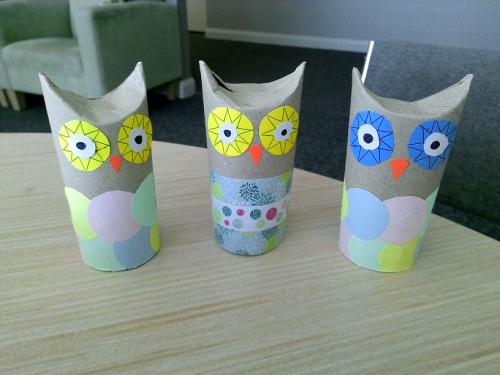
Toilet roll Owl Army - upcycle tutorial


Got some toilet rolls lying around? If you have any children, chances are, yes.

This is a fantastic, cheap and oh so very cute way to fill in an hour or so and add some quirky flair to your home decor.

I used this tutorial to make them. It's not in English, but the pictures are easy enough to follow.

Enjoy!
Also, what is your perfect upcycle project? Or what do you have lying around that you just can't figure out what to do with? Comment below :)